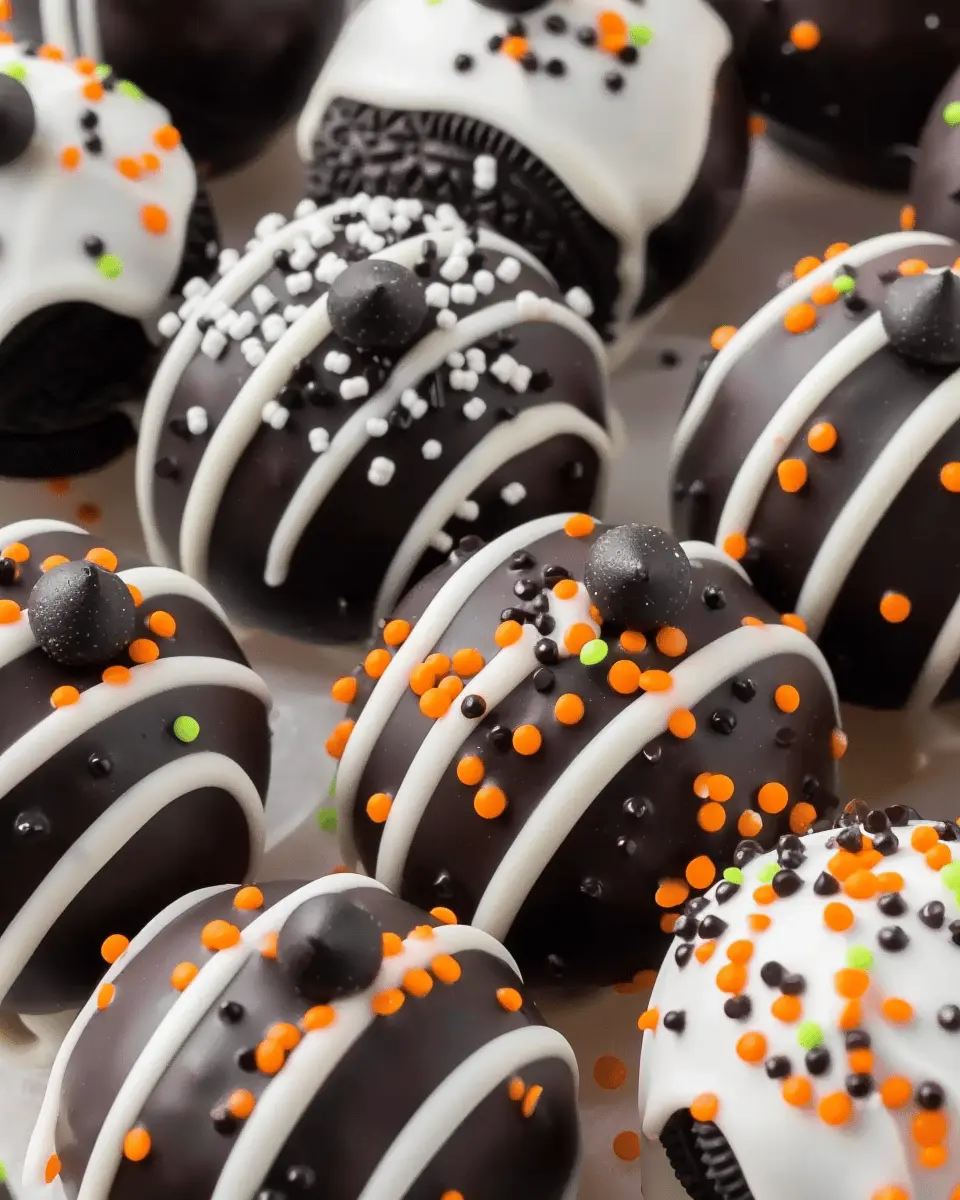
Introduction to Halloween Oreo Balls
As the leaves change and the air turns crisp, the excitement for Halloween begins to build. One of the best ways to celebrate this spooky season is with fun, festive treats that are easy to make and even more enjoyable to eat. Halloween Oreo Balls are the perfect addition to your Halloween festivities. These delightful little bites are not just visually appealing; they also pack a punch of flavor that makes them irresistible!
Why Halloween Oreo Balls are the perfect spooky treat?
So, what is it about Halloween Oreo Balls that makes them such a great choice for your Halloween gathering? Here are a few enticing reasons:
-
Easy to Make: If you’re short on time or kitchen expertise, these treats are a lifesaver. Traditionally made with just three ingredients—Oreo cookies, cream cheese, and chocolate for coating—you can whip them up in no time! For a step-by-step guide, check out this helpful tutorial.
-
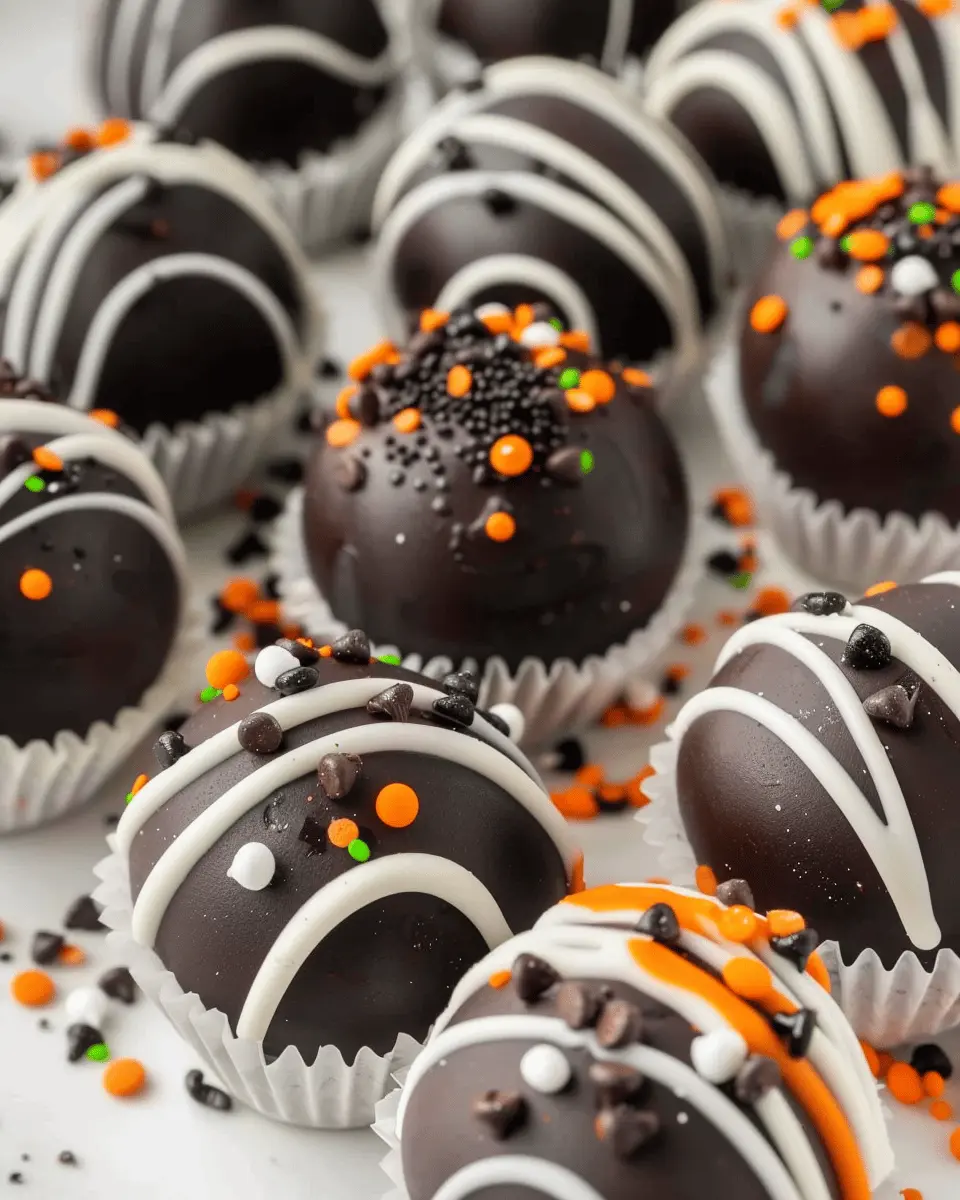
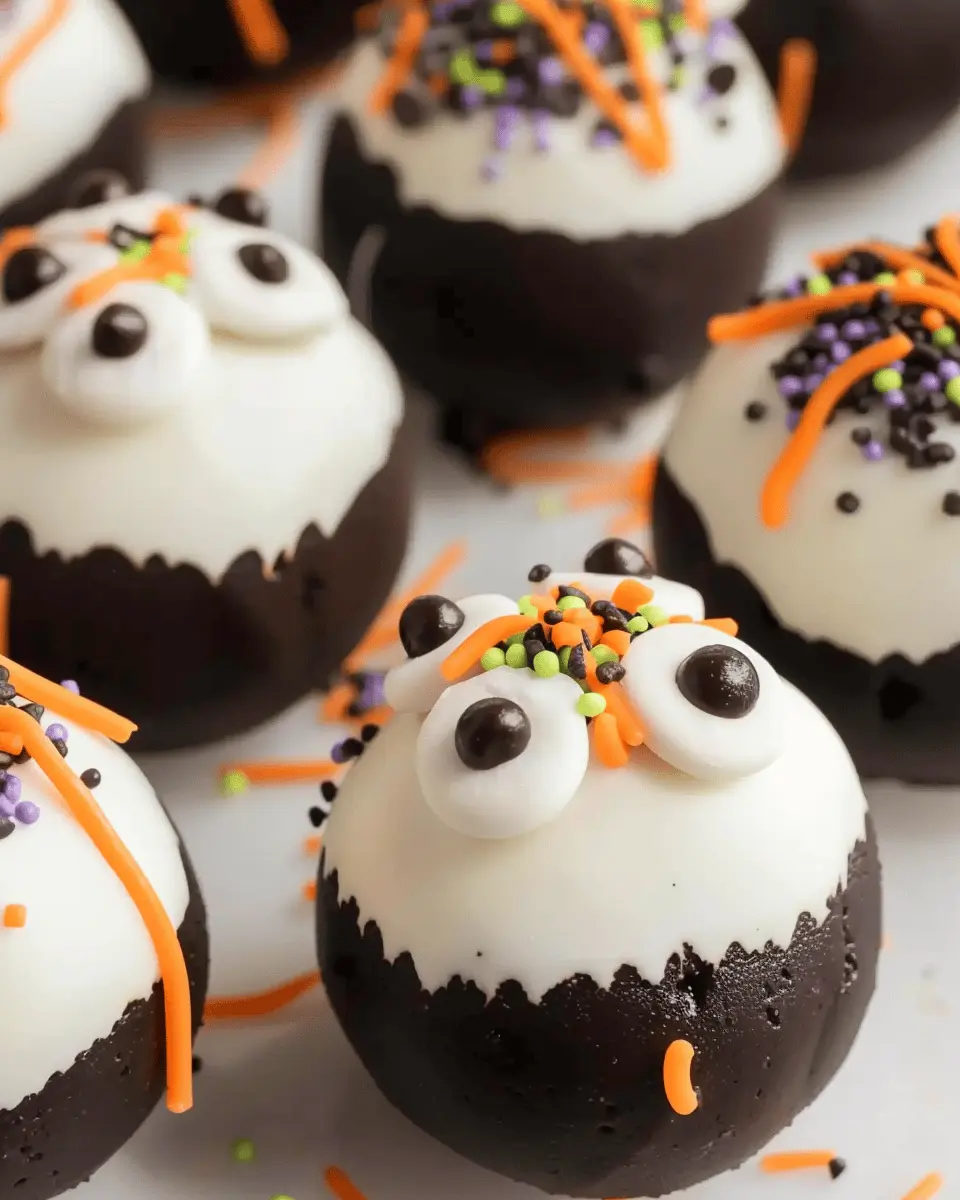
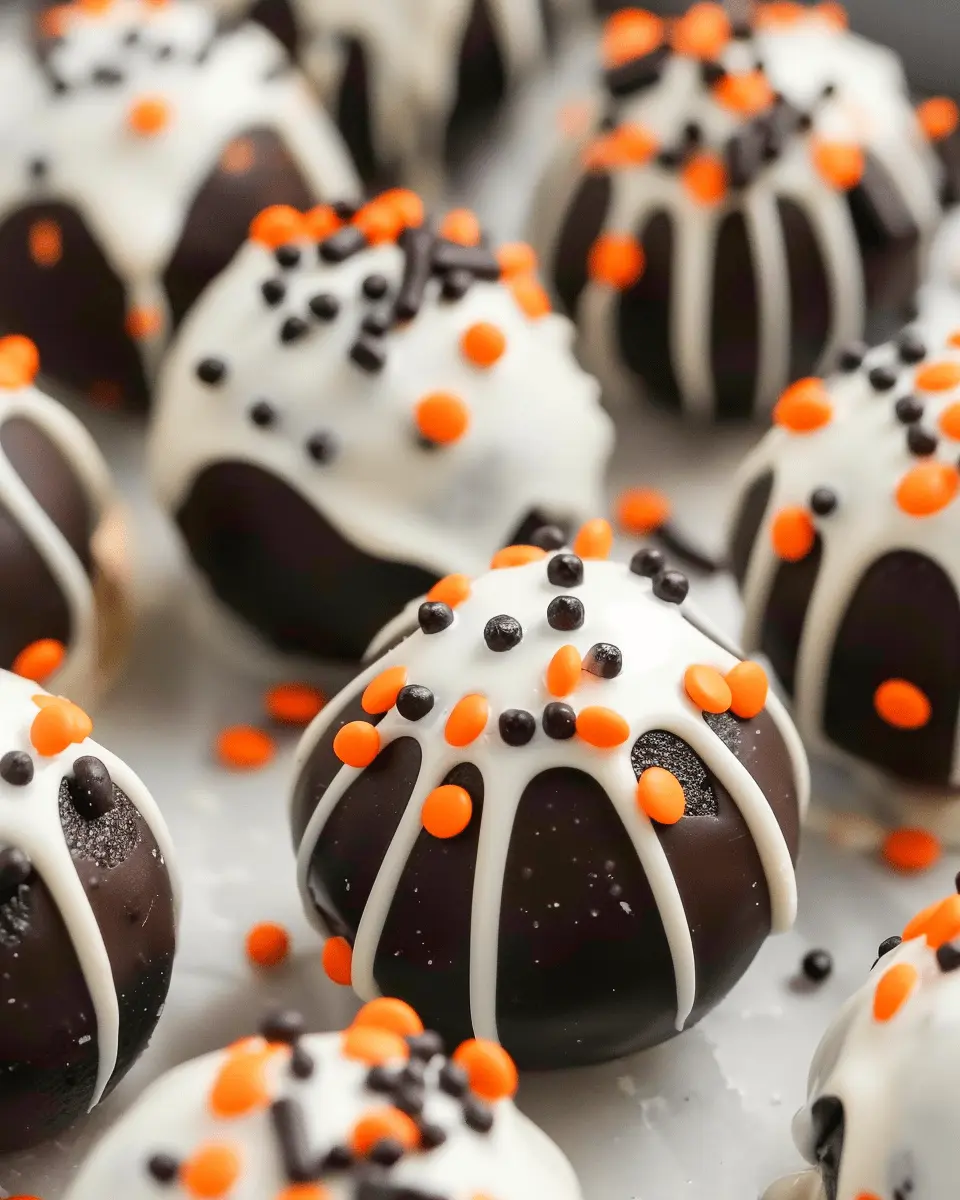
Customizable Design: The beauty of Halloween Oreo Balls is their versatility. You can easily transform them into spooky designs with different toppings. Think orange sprinkles, candy corn, or even edible eyes to give them that eerie flair!
-
Crowd-Pleasers: Whether you’re serving them at a party or sharing them with friends and family, these treats are sure to be a hit. Kids and adults alike will find it hard to resist their creamy, crunchy goodness.
-
Storage-Friendly: What’s more, these balls can be prepared in advance, making them not just a delicious option but also a practical one. You can store them in the fridge or freezer, ensuring you have them on hand for surprise guests or last-minute gatherings.
-
Themed Pairings: To elevate your Halloween celebration, consider pairing your Halloween Oreo Balls with fun drinks. Think of pumpkin spice lattes or vibrant fruit punches – they’ll complement the festive vibe perfectly!
In short, if you’re looking for a spooky treat that brings people together without breaking the bank—or your patience—look no further than Halloween Oreo Balls. They embody the spirit of the season, blending simplicity with a delightful twist that will add joy to any Halloween celebration. So grab those Oreos, and let’s get creative!
Ingredients for Halloween Oreo Balls
Creating delicious Halloween Oreo Balls is a delightful way to celebrate the spooky season. These tasty treats are not only simple to make but also require just a few essential ingredients.
Essential ingredients
To whip up a batch of these enjoyable bites, you’ll need:
- Oreo cookies: About 24 classic Oreos work perfectly. Their chocolatey goodness is key!
- Cream cheese: One 8-ounce package, softened. This adds that rich, creamy texture.
- Chocolate coating: Choose between semi-sweet chocolate chips or white chocolate for a sweet shell.
These fundamental components provide the base for your Halloween Oreo Balls—easy yet incredibly satisfying. For additional inspiration, check out Allrecipes for some creative spins on this delightful treat.
Optional topping ideas
Elevate your Halloween Oreo Balls with fun toppings! Here are some options to try:
- Crushed Oreos: for a classic sprinkle.
- Halloween sprinkles: Add festive colors and shapes.
- Drizzled chocolate: A contrasting drizzle looks and tastes great.
- Nuts or coconut flakes: For some extra crunch and flavor.
These toppings bring your Halloween Oreo Balls to life, making them as fun to create as they are to eat!
Preparing Halloween Oreo Balls
When it comes to celebrating Halloween, Halloween Oreo Balls are a fun and delicious treat that comes together in a snap. Imagine a rich chocolatey exterior giving way to a creamy, cookie-flavored center—it’s no wonder these balls are a favorite for spooky gatherings! Let’s dig into how you can whip these up in no time.
Crumble the Oreos
The first step is all about the base: Oreos! You’ll need about a pack of regular Oreos—feel free to also experiment with seasonal flavors if you’re feeling adventurous. Break them into manageable pieces and toss them into a food processor. Pulse them until you have fine crumbs, resembling sand.
Don’t have a food processor? No problem! You can place them in a resealable plastic bag and crush them with a rolling pin—just make sure to seal the bag tightly. Once you have those lovely fine crumbs, transfer them to a mixing bowl, and get ready to mix in the next ingredient!
Combine with Cream Cheese
Now it’s time to add the magic ingredient: cream cheese. You’ll want about 8 ounces of softened cream cheese to achieve that perfectly creamy texture. Use a spatula or your hands (gloved, of course) to combine the Oreo crumbs and cream cheese thoroughly. It’s important that the cream cheese is softened, as this will make the mixing process much easier.
Pro tip: For an extra boost of flavor, consider adding a sprinkle of vanilla extract. This little touch can elevate your Halloween Oreo Balls to the next level.
Form the Oreo Balls
Once you’ve got a consistent mixture, it’s time to form your Oreo balls! Take small portions of the mixture—about a tablespoon in size—roll them into balls, and place them on a baking sheet lined with parchment paper. If the mixture is too sticky, you might want to chill it for a few minutes to make rolling easier. As you form these little morsels, don’t be afraid to get your hands a bit messy; it’s all part of the fun!
Chill the Mixture
After you’ve shaped all your Halloween Oreo Balls, it’s important to chill them. Place the baking sheet in the refrigerator for at least 30 minutes, or until they firm up. This chilling time allows the flavors to meld beautifully and ensures that your balls maintain their shape when coated in chocolate. You could also prepare this step the night before if you’re looking to save time the day of your festivities.
Melt the Chocolate and Coat the Balls
Next comes the magic of chocolate! You’ll want to melt about 16 ounces of bittersweet or white chocolate, depending on your preference. A double boiler works wonders for melting chocolate evenly, but if you’re short on time, simply microwave it in short 30-second bursts, stirring in between.
Once melted, dip each chilled Oreo ball into the chocolate using a fork to ensure it’s fully coated. Let any excess chocolate drip off before placing the balls back on the parchment paper. This is where the fun can really begin!
Add Spooky Decorations
Finally, let your creativity shine! Once the chocolate coating has set slightly, you can garnish your Halloween Oreo Balls with sprinkles, edible glitter, or even drizzle some contrasting chocolate on top for an added design. For a truly spooky touch, add candy eyes or mini Halloween-themed decorations.
As you prepare these adorable treats, feel free to share your creations on social media! Links to Delish and Food Network can also give you some inspiration for more party-ready decorations.
Creating Halloween Oreo Balls is not just about the end product; it’s a festive activity you can narrow down to a fun gathering with friends or family. So grab your ingredients, put on your favorite Halloween tunes, and get ready to impress with these delicious bites! With just a few simple ingredients, you’ll soon have a treat that’s sure to be a hit at any Halloween gathering.
Variations on Halloween Oreo Balls
Halloween Oreo Balls are not just a delectable treat; they can be customized to suit your taste or dietary needs. Here are some fun variations that will surely impress your friends at your next Halloween gathering.
Pumpkin Spice Oreo Balls
Nothing screams fall like the comforting flavors of pumpkin spice! To make pumpkin spice Oreo balls, simply substitute original Oreo cookies with pumpkin spice Oreos. Crush them up, mix with cream cheese, and roll into balls. For an extra kick, add a dash of cinnamon to the mixture. Once dipped in white chocolate, sprinkle a bit more cinnamon on top for an irresistible look and flavor!
Minty Halloween Oreo Balls
If you adore the refreshing taste of mint, these minty Halloween Oreo balls are perfect for you. Use mint-flavored Oreos and follow the same process as the original recipe. You can enhance the mint flavor further by adding a drop of peppermint extract to the mixture. Coat them in dark chocolate to create a striking contrast, and just like that, you’ve got a minty twist on a classic that your guests won’t forget!
Gluten-Free Halloween Oreo Balls
For those who are gluten-sensitive, making gluten-free Halloween Oreo balls is a breeze. Simply choose gluten-free Oreos (most brands offer this option now). The process remains the same: crush, mix, roll, and coat! You might want to check out this gluten-free cookie guide for more tips on alternatives!
Try these exciting variations to keep your Halloween Oreo balls fresh and your guests guessing. Each bite offers a seasonal twist that captures the spirit of Halloween while delighting the taste buds!
Cooking Tips and Notes for Halloween Oreo Balls
Best Practices for Melting Chocolate
Melting chocolate for your Halloween Oreo Balls can be a game-changer for their appearance and taste. First, consider using a double boiler—this gentle method prevents scorching and offers even heat. If you opt for the microwave, heat your chocolate in 30-second intervals, stirring in between. This helps prevent overheating and gives you better control over the melting process. For a smoother finish, you might mix in a tablespoon of coconut oil or vegetable shortening.
Tips for a Smoother Texture
Achieving a silky texture for your Halloween Oreo Balls is critical. After crushing the Oreos, mix them thoroughly with the cream cheese until you’ve got a consistent blend. A food processor can work wonders here, making the mixture super smooth. Also, ensure that your chocolate coating is fully melted and has cooled slightly before dipping your balls. This prevents clumping and helps them look professionally finished. Want an even flavor twist? Consider adding a hint of vanilla or orange extract to the cream cheese mixture for a seasonal touch!
For more tips on chocolate melting, you can check out this helpful guide from the Chocolate Manufacturers Association. Enjoy the process—these treats are as fun to make as they are to eat!
Serving suggestions for Halloween Oreo Balls
Creative ways to present the treats
When it comes to Halloween Oreo Balls, presentation can elevate these delicious bites from ordinary to extraordinary! Try setting them on a spooky-themed platter adorned with fake spider webs and plastic spiders for a thrilling touch. Using clear bags tied with orange or black ribbons is another charming way to package them as individual treats. You could even create a creepy candy buffet, mixing Halloween Oreo Balls with other festive candies like gummy worms and candy corn for an eye-catching spread.
Pairing ideas for parties
Pairing your Halloween Oreo Balls with the right snacks can enhance the fun at your gathering. Consider serving them with:
- Pumpkin spice cupcakes for a seasonal classic.
- Spooky punch made with fruit juice and floating fruit “eyeballs” (grapes or lychee with blueberries).
- Cheese platters featuring savory options like turkey bacon-wrapped bites or chicken ham slices to balance out the sweetness.
By combining flavors, you’ll create a well-rounded experience that your guests will love! For additional festive ideas, check out Food Network’s Halloween Party Guide.
Discover the joy of serving Halloween Oreo Balls this season—your guests will definitely appreciate the effort!
Time breakdown for Halloween Oreo Balls
When it comes to making Halloween Oreo Balls, understanding the time commitment can help you plan your spooky soirée. Here’s a quick breakdown to get you started.
Preparation time
You’ll need about 20 minutes to prepare your ingredients and mix everything together. This includes crushing the Oreos and combining them with cream cheese to get that perfect, creamy mixture.
Chilling time
After rolling your Halloween Oreo Balls, let them chill in the fridge for at least 30 minutes. This step is crucial for letting them firm up, making them easier to coat in chocolate later.
Total time
In total, you’re looking at around 50 minutes from start to finish. Perfect for a last-minute treat or a fun Halloween-themed baking session! Planning a spooktacular gathering? Check out more tips for festive treats on sites like Food Network or AllRecipes!
Nutritional facts for Halloween Oreo Balls
When indulging in your Halloween Oreo Balls, it’s essential to balance enjoyment with nutritional awareness. Here’s a quick glance at what you’re getting with each delectable bite.
Calories per serving
Each serving of these delightful treats contains approximately 150 calories. This makes them a perfect sweet snack for sharing (or keeping all to yourself) during festive celebrations.
Breakdown of macronutrients
- Carbohydrates: About 22g, mainly from the Oreo cookies and cream cheese. These provide a quick energy boost for your Halloween festivities.
- Protein: Roughly 2g, thanks largely to the cream cheese. While not a high protein snack, every little bit helps!
- Fat: Around 7g, primarily from the cream cheese and chocolate coating. Fats help keep you satiated—perfect for those long nights of trick-or-treating or spooky movie marathons!
For a deep dive into the importance of balanced nutrition, check out resources like the USDA’s Dietary Guidelines. Remember to enjoy everything in moderation, especially during the sugar-laden season of Halloween!
FAQs about Halloween Oreo Balls
Can I make these in advance?
Absolutely! Preparing Halloween Oreo Balls in advance is not only practical but also a great way to save time during the hustle and bustle of the Halloween season. You can mix your chocolate-covered Oreo mixture ahead of time, roll them into balls, and store them in the refrigerator until you’re ready to coat them in chocolate. You can even dip them in chocolate a day before serving. Just remember to keep them covered so they stay fresh.
How long do they last in the fridge?
Once prepared, your Halloween Oreo Balls can typically last in the fridge for about 1 to 2 weeks. Just keep them stored in an airtight container to maintain their deliciousness and prevent any browning. If you plan to keep them longer, consider freezing them instead. They are perfect for defrosting on Halloween night or any festive event!
What can I substitute for cream cheese?
If you’re not a fan of cream cheese, or if someone in your circle is lactose intolerant, don’t worry! There are great alternatives. You can use mascarpone cheese for a creamier texture, or even Greek yogurt, which adds a nice tangy flavor. For a vegan option, try using cashew cream or even dairy-free cream cheese. Each substitute will give your Halloween Oreo Balls a unique twist, making the recipe adaptable for everyone.
Feel free to explore these substitutions and embrace the versatility of this delightful treat. For more tips, check out food safety guidelines at FoodSafety.gov.
Conclusion on Halloween Oreo Balls
Why You Need to Try These Delights!
As you wrap up your Halloween preparations, don’t overlook the delightful Halloween Oreo Balls. These treats are not just incredibly easy to make, but they also pack a flavor punch that will impress guests of all ages. Imagine sinking your teeth into a rich, creamy, chocolatey ball that balances the sweetness of Oreos with a touch of festive flair.
But why stop there? These sweet morsels are perfect for parties, classroom treats, or even a cozy night in. Plus, they serve as a fantastic conversation starter—who wouldn’t want to share their favorite Halloween treat? Next time you’re looking for a fun and easy recipe, remember the joy of creating these Halloween Oreo Balls; you won’t be disappointed!
Check out more fun Halloween recipes.
PrintHalloween Oreo Balls: Easy Recipe for a Spooky Treat Delight
Learn how to make delicious Halloween Oreo Balls with this easy recipe. They are perfect for Halloween parties!
- Prep Time: 20 minutes
- Cook Time: 10 minutes
- Total Time: 40 minutes
- Yield: 24 balls 1x
- Category: Dessert
- Method: No-bake
- Cuisine: American
- Diet: Vegetarian
Ingredients
- 1 package Oreo cookies
- 8 oz cream cheese, softened
- 2 cups white chocolate chips
- 1 tsp orange food coloring
- Sprinkles for decoration
Instructions
- Crush the Oreo cookies in a food processor until fine crumbs form.
- Add the softened cream cheese and mix until well combined.
- Form the mixture into balls and place on a baking sheet lined with parchment paper.
- Chill in the refrigerator for 30 minutes.
- Melt the white chocolate chips in the microwave and stir in the orange food coloring.
- Dip the chilled Oreo balls in the orange chocolate coating.
- Sprinkle with decorations before the chocolate sets.
- Let them cool completely before serving.
Notes
- Ensure the cream cheese is at room temperature for easy mixing.
- Customize with different food colors and sprinkles for other occasions.
Nutrition
- Serving Size: 2 balls
- Calories: 150
- Sugar: 12g
- Sodium: 50mg
- Fat: 8g
- Saturated Fat: 5g
- Unsaturated Fat: 2g
- Trans Fat: 0g
- Carbohydrates: 18g
- Fiber: 1g
- Protein: 2g
- Cholesterol: 15mg
Keywords: Halloween Oreo Balls