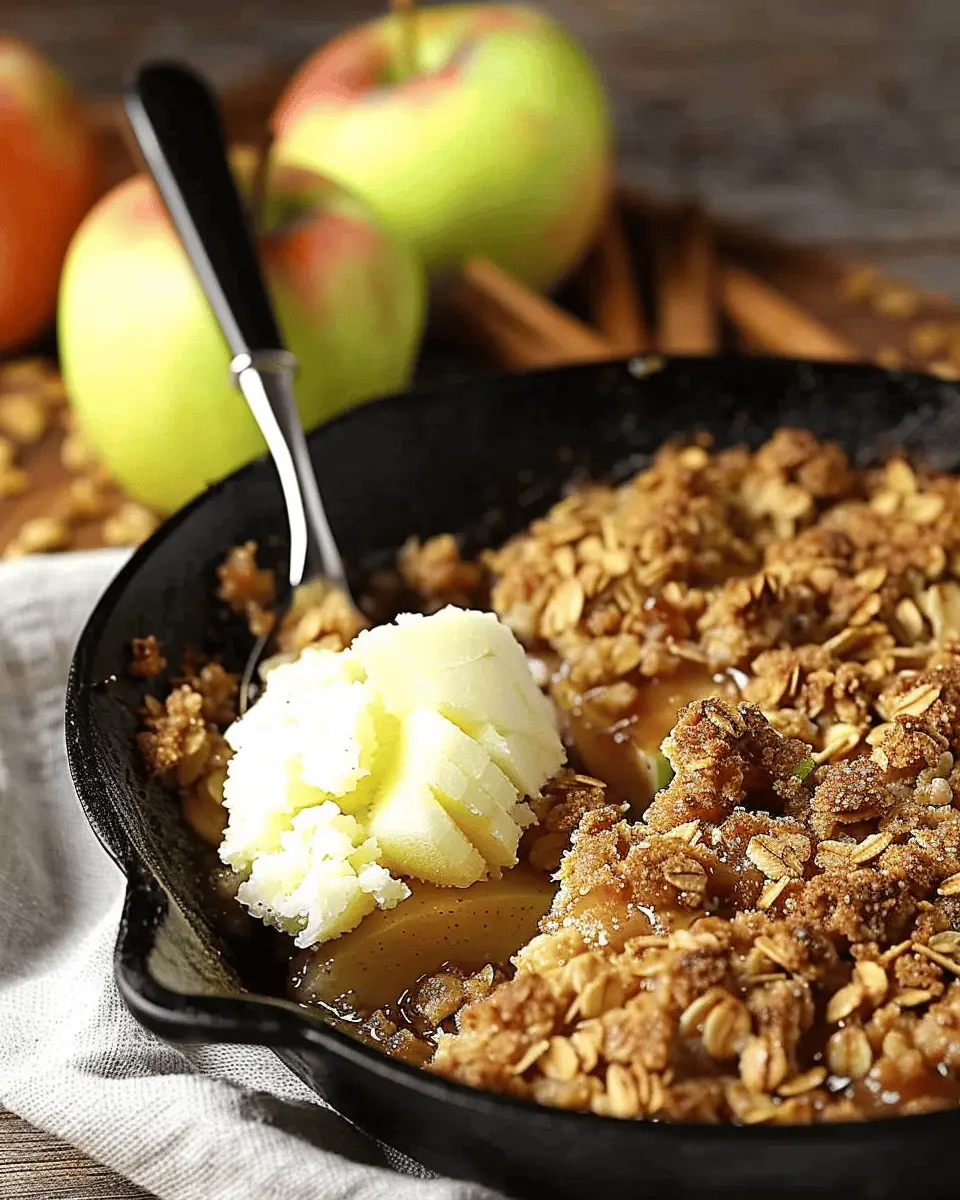
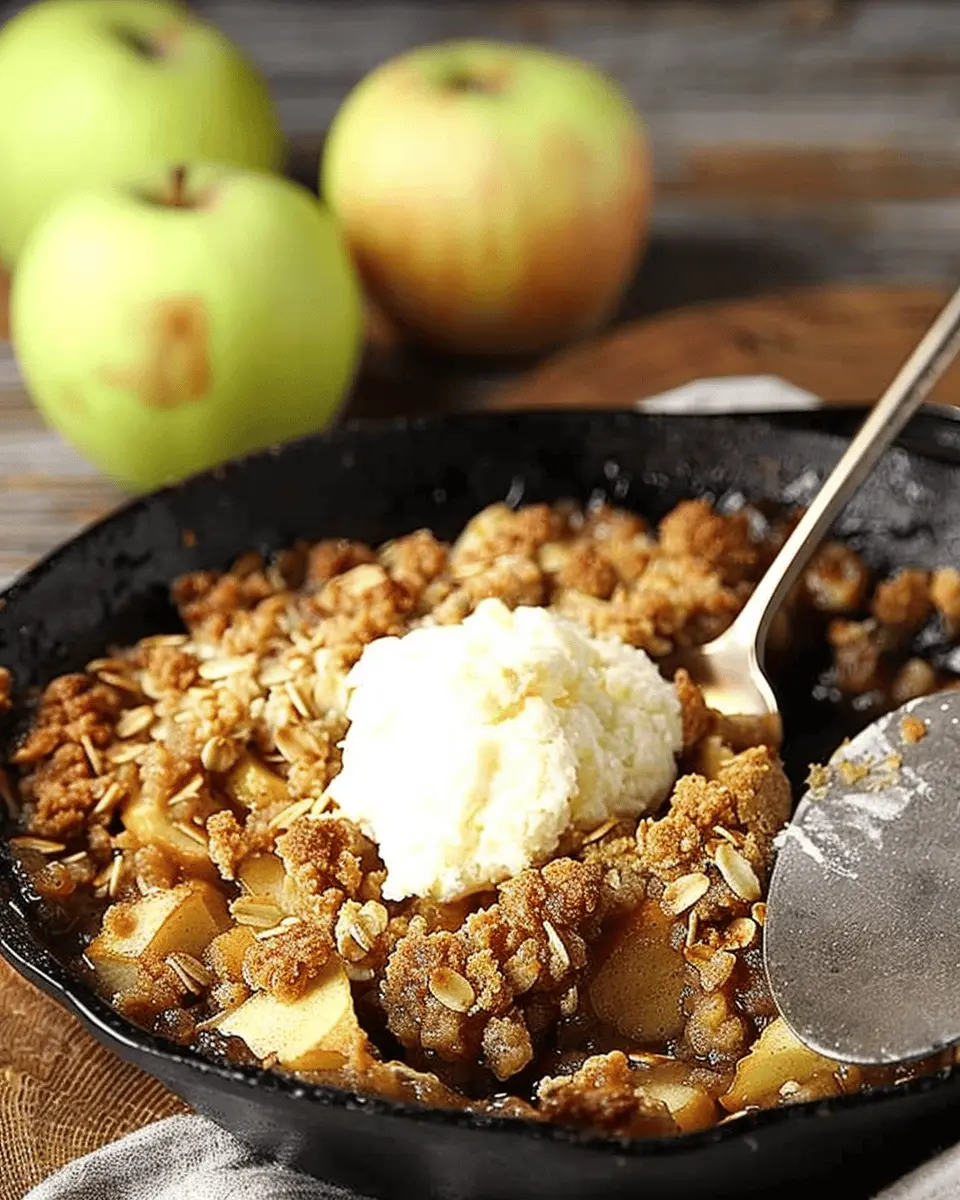
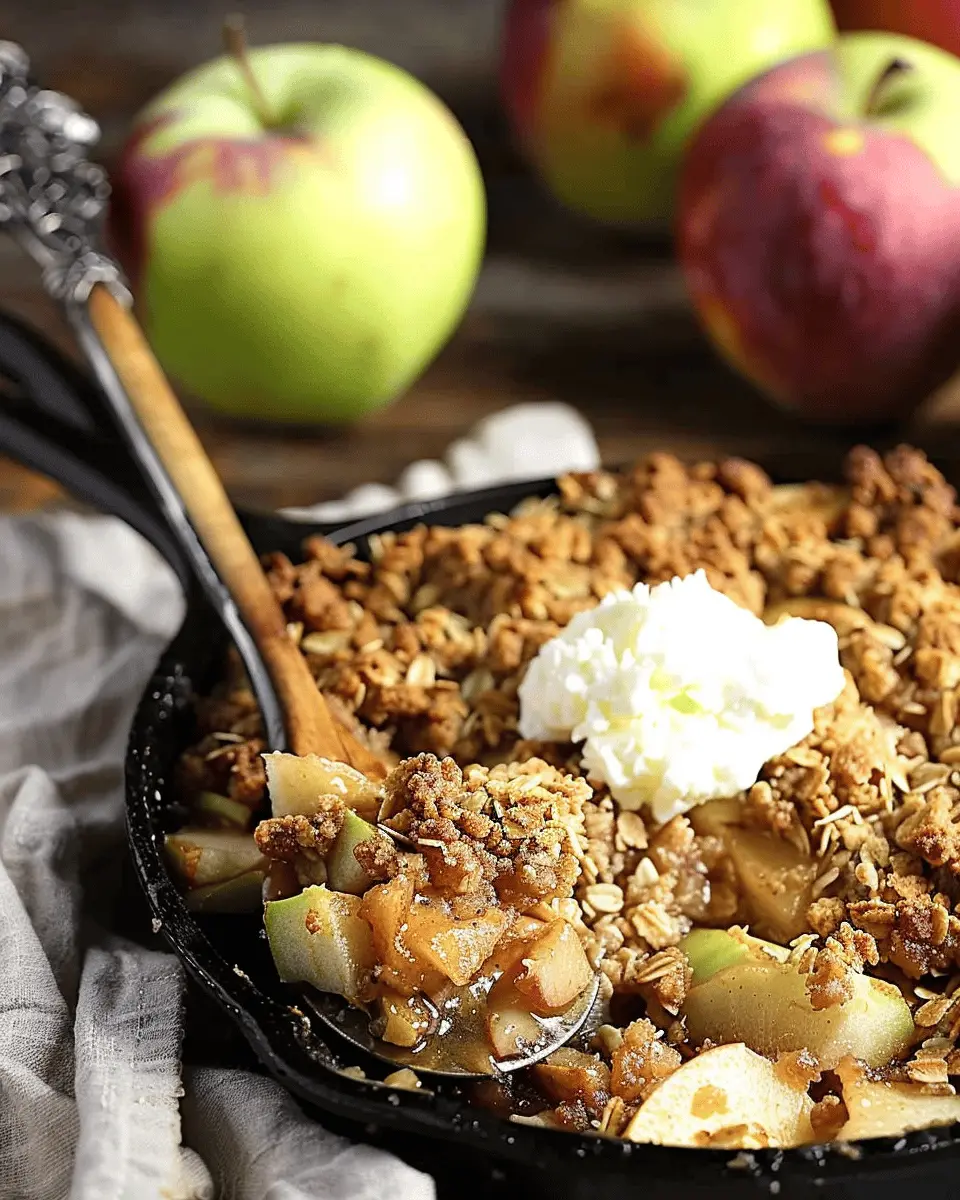
Introduction to Cast Iron Skillet Apple Crisp
As the leaves begin to change and the air turns crisp, nothing feels quite as comforting as a warm, homemade dessert. Enter the cast iron skillet apple crisp—a dish that combines sweet, tender apples with a crunchy topping, creating the perfect cozy treat for fall. But why exactly should you cook this delightful dessert in a cast iron skillet? Let’s dive in!
Why a Cast Iron Skillet Makes a Difference
First off, the benefits of using a cast iron skillet are significant—especially when it comes to baking. Cast iron skillets are known for their exceptional heat retention and even cooking. This means your apple crisp will not only bake evenly but also develop that heavenly crispy topping you crave. As it cooks, the skillet retains heat, continuing to bake the dessert even after it’s out of the oven. This results in a crispy crust that contrasts beautifully with the tender, caramelized apples beneath.
Why is this important? Well, according to the American Society for Nutrition, evenly cooked food not only tastes better but also enhances texture, making every bite satisfying. Plus, a cast iron skillet gives a rustic, homely presentation that’s perfect for serving guests or even enjoying a cozy night in on the couch.
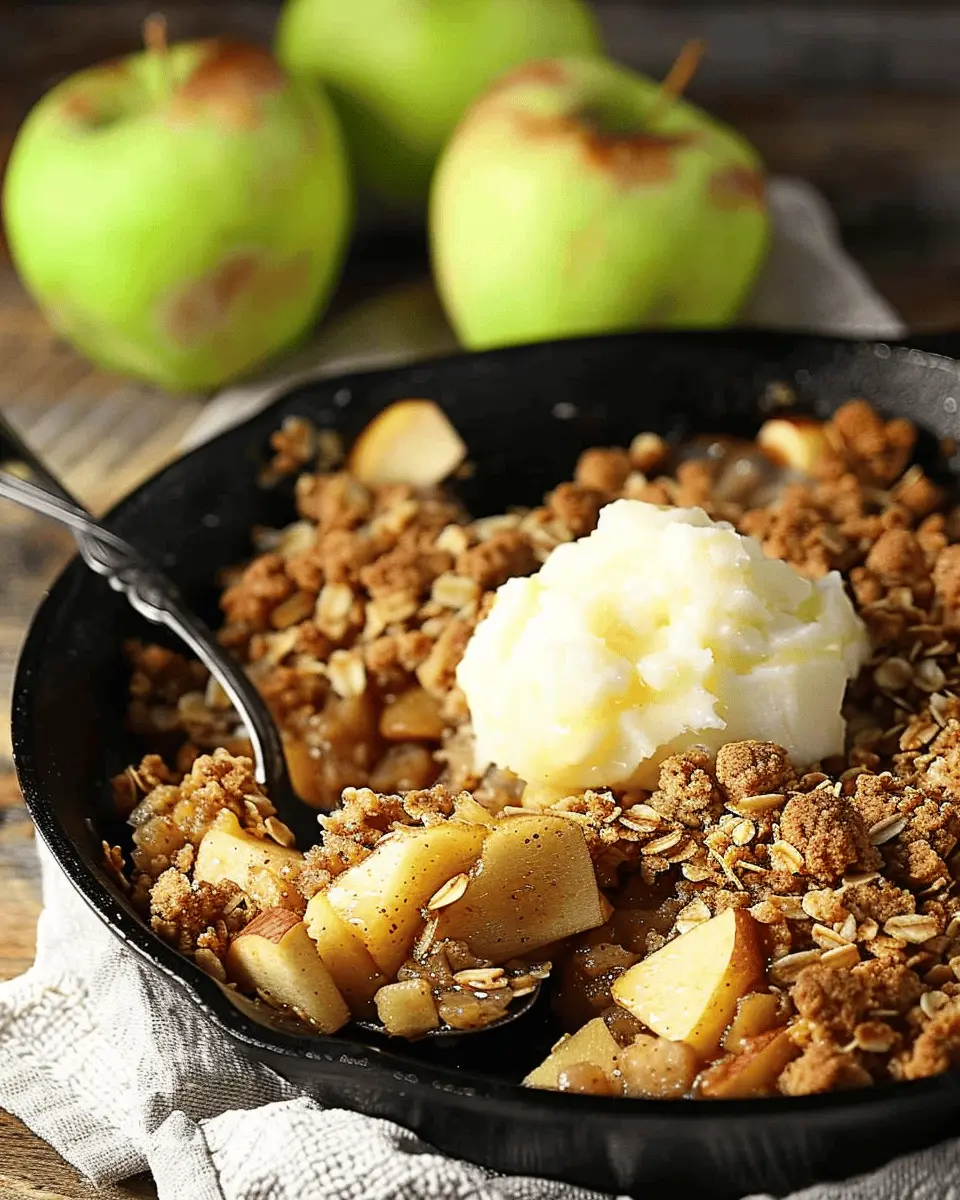
Perfect for Any Occasion
Whether it’s a family gathering, a casual dinner with friends, or just a treat for yourself, this apple crisp recipe serves as a fantastic centerpiece. You’ll find the aroma of baked apples and cinnamon wafting through your kitchen, enticing everyone who walks by. Plus, the ingredients are simple and often already in your pantry, making it a great go-to dessert when you want something special without a lot of fuss.
Ready to impress? Just imagine serving a warm cast iron skillet apple crisp topped with a scoop of vanilla ice cream or dollops of whipped cream, drizzled with caramel sauce. It’s an unbeatable combination!
In the next section, we’ll dive into the ingredients you’ll need for this delicious recipe and guide you through each step to ensure your cast iron skillet apple crisp turns out perfectly every time. So grab your skillet, and let’s get baking!
Ingredients for Cast Iron Skillet Apple Crisp
Creating a delicious cast iron skillet apple crisp is a delightful way to celebrate the fall season. Let’s break down the essential ingredients to ensure your dessert turns out perfectly!
Filling Ingredients
For a scrumptious filling, gather the following:
- 6 cups of tart apples (like Granny Smith or Honeycrisp), peeled and sliced
- ¾ cup granulated sugar
- 1 tablespoon lemon juice
- 1 teaspoon ground cinnamon
- ½ teaspoon ground nutmeg
- ¼ teaspoon salt
These firm apples create a wonderful texture and the balance of sweet and tart flavors enhances every spoonful.
Topping Ingredients
The topping is where the magic truly happens! You’ll need:
- 1 cup old-fashioned rolled oats
- ½ cup all-purpose flour
- ½ cup packed brown sugar
- 1 teaspoon ground cinnamon
- ½ cup unsalted butter, melted
- Pinch of salt
This combination gives you that irresistible crunchy topping that contrasts beautifully with the soft apple filling.
Equipment Needed
To make your cast iron skillet apple crisp, ensure you have:
- A 10-12 inch cast iron skillet
- Mixing bowls
- A sharp knife for slicing apples
- A measuring cup and spoons
Armed with these ingredients and tools, you’re well on your way to creating a heartwarming cast iron skillet apple crisp. For more tips on how to choose the best apples, check out this helpful guide. Happy baking!
Preparing Cast Iron Skillet Apple Crisp
Creating a delectable cast iron skillet apple crisp is perfect for those cozy fall evenings. The rich aroma of baked apples mingling with spices always has a way of making your home feel warm and inviting. Let’s dive into how to prepare this delicious dessert step-by-step.
Step 1: Prepare the Topping Mixture
The topping is what makes a great apple crisp truly crisping good! Here’s what you’ll need:
- 1 cup old-fashioned oats
- 1 cup all-purpose flour
- 3/4 cup brown sugar
- 1/2 cup granulated sugar
- 1 teaspoon ground cinnamon
- 1/4 teaspoon salt
- 1/2 cup cold butter, cubed
In a mixing bowl, combine the oats, flour, brown sugar, granulated sugar, cinnamon, and salt. Stir until well blended. Next, add the cold butter cubes to the mixture. This is where it gets a bit messy, but trust me—it’s worth it! Using your hands or a pastry cutter, mix until the mixture resembles coarse crumbs. The cold butter will create those lovely, flaky bits that we all love in a crisp.
Step 2: Prepare the Apple Filling
For the filling, you’ll want to choose the right apples. Tart varieties like Granny Smith or Honeycrisp provide a nice contrast to the sweet topping. You’ll need:
- 6 medium-sized apples, peeled, cored, and sliced
- 1/2 cup granulated sugar
- 1 teaspoon ground cinnamon
- 1 tablespoon lemon juice
In a large bowl, toss the sliced apples with granulated sugar, cinnamon, and lemon juice. The lemon juice not only adds flavor but also helps prevent oxidation, keeping your apples looking fresh and vibrant. Let the filling sit for about 10 minutes; this allows the flavors to mingle and the sugars to draw out some of the juices. You’ll be left with a lovely, syrupy mixture.
Step 3: Combine and Mix the Ingredients
Once your topping and filling are prepared, it’s time to combine everything together. While you don’t need to mix these two components, make sure they’re ready to seamlessly blend in your cast iron skillet apple crisp. The layers are what create that perfect texture, so think of it as preparing an inviting landscape in your skillet—nice and organized!
Step 4: Assemble in the Cast Iron Skillet
Grab your trusty cast iron skillet; its ability to retain heat will give you that beautiful golden-brown topping. First, pour the apple mixture into the skillet, spreading it evenly. Then, sprinkle the topping mixture generously over the apples. Feel free to use your hands to break any large clumps for even baking. This layering creates that irresistible contrast of warm, spicy apples and crunchy topping.
Step 5: Bake to Perfection
Now comes the best part: baking! Preheat your oven to 350°F (175°C). Place your cast iron skillet in the oven and let it bake for about 35-40 minutes, or until the topping is golden and the apples are bubbling. A kitchen timer is a great way to keep track of this; no one wants to forget their cast iron skillet apple crisp baking away!
As it bakes, feel free to enjoy the enticing aroma wafting through your home. It’s all part of the experience!
Once it’s done, let it cool for a few minutes before digging in. Serve warm with a scoop of vanilla ice cream or a dollop of whipped cream for the ultimate treat.
Enjoy sharing this delightful dessert with your friends and family this fall season! For more tips and delicious recipes, check out Food Network and Serious Eats. Happy baking!
Variations on Cast Iron Skillet Apple Crisp
Creating a delicious cast iron skillet apple crisp doesn’t have to be a one-size-fits-all endeavor. There are so many ways to tailor this comforting dish to suit dietary needs and flavor preferences. Let’s explore some fun variations!
Gluten-Free Apple Crisp
For those avoiding gluten, making a gluten-free apple crisp is incredibly easy. Simply replace traditional oats and flour with gluten-free alternatives. Consider using almond flour or coconut flour mixed with certified gluten-free oats for that classic crunch. Many brands offer gluten-free pie mixes that work beautifully as a topping, allowing everyone to enjoy this delicious fall treat without worry.
Nut-Free Apple Crisp
If you have nut allergies or are preparing the dish for someone who does, it’s a breeze to make your cast iron skillet apple crisp nut-free! Just use rolled oats and swap in seeds like pumpkin or sunflower for a similar crunch. Additionally, be sure your butter or margarine is not cross-contaminated with nuts, or opt for a seed-based butter to drizzle on top before baking.
Adding Spices and Flavors
Don’t hesitate to get creative with spices and flavors to elevate your apple crisp! A pinch of cinnamon is a classic, but what about adding nutmeg or even a dash of cardamom for distinctive layers of warmth? You can also mix in dried fruits like cranberries or raisins for a delightful texture contrast. Want a touch of zest? Lemon juice can brighten your filling beautifully. Consider exploring resources like The Spice House for inspiration on unique spice blends to take your cast iron skillet apple crisp to the next level.
By experimenting with these variations, you can make your apple crisp uniquely yours while still staying true to that cozy fall vibe. Enjoy the process!
Cooking Tips and Notes for Cast Iron Skillet Apple Crisp
Ensuring Even Cooking
Using a cast iron skillet for your apple crisp not only adds flavor but helps ensure even cooking. To achieve this, make sure to slice your apples uniformly. Thinner slices will cook faster and create a tender filling, while thicker pieces add some nice texture. Stir the filling occasionally while baking to promote even heating. If you find that the top is browning too quickly, cover it with foil for the last few minutes.
Choosing the Right Apples
The choice of apples impacts the flavor and texture of your cast iron skillet apple crisp. Opt for a mix of tart apples like Granny Smith and sweeter varieties like Fuji or Honeycrisp for a balanced taste. Did you know that there are over 7,500 apple varieties worldwide? Each offers a unique flavor profile, so don’t hesitate to experiment with combinations.
Storing Leftovers
If you have any leftovers from your delicious cast iron skillet apple crisp, they can be stored in the fridge for up to three days. Cover the pan with plastic wrap or transfer the crisp to an airtight container. When reheating, a quick pop in the oven will revive its original deliciousness. Enjoy it warm with a scoop of vanilla ice cream to bring back that fresh-baked feeling!
Serving Suggestions for Cast Iron Skillet Apple Crisp
Ice Cream and Whipped Cream Options
When it comes to serving your cast iron skillet apple crisp, nothing elevates this delightful dish quite like a scoop of ice cream or a dollop of whipped cream. Vanilla is a classic choice, offering a creamy contrast to the spiced apples. For something a bit more adventurous, try:
- Cinnamon Ice Cream: Adds a warm, comforting flavor that perfectly complements the cinnamon-spiced apples.
- Caramel Swirl Ice Cream: The rich caramel notes enhance the apple crisp without overwhelming it.
- Whipped Cream: Light and airy, it’s an excellent choice if you prefer a softer finish to your dessert.
Flavor Pairings
To take your apple crisp experience to the next level, consider some flavor pairings:
- Nuts and Seeds: Sprinkle some toasted pecans or walnuts on top for added crunch.
- Dried Fruit: Incorporating a handful of dried cranberries or apricots can give your dish a chewy texture and extra sweetness.
The best part? Each serving is easily customizable based on what you love. How do you plan to enjoy your cast iron skillet apple crisp? Share your favorite toppings in the comments! For more inspiration, check out this guide on apple dessert pairings.
By matching flavors and textures, your cast iron skillet apple crisp will not just be a dessert; it will be an unforgettable experience!
Time Breakdown for Cast Iron Skillet Apple Crisp
Preparation Time
To get your delicious cast iron skillet apple crisp rolling, you’ll need about 15-20 minutes for preparation. This includes peeling, coring, and slicing your apples, as well as mixing your dry ingredients. Consider listening to some music or a podcast while you work—time flies when you’re having fun!
Cooking Time
After preparing all your ingredients, the cooking portion will take around 30-35 minutes. This allows for that perfect bubbly, golden topping that makes a cast iron skillet apple crisp so irresistible. Keep an eye on it to achieve that lovely, crisp texture!
Total Time
In total, you’re looking at about 50-55 minutes from start to finish. Perfect for when you want something warm and comforting at the end of your busy day, don’t you think? You can pair this sweet delight with a warm beverage like tea or coffee for a cozy evening.
For more apple-inspired desserts, check out this guide on the best apple varieties for baking and elevate your dessert game!
Nutritional Facts for Cast Iron Skillet Apple Crisp
When considering a delicious dessert like cast iron skillet apple crisp, knowing the nutritional information can help you enjoy it guilt-free! Let’s break down the key facts:
Calories per serving
Each serving of this apple crisp packs approximately 200-250 calories. This makes it a delightful treat that won’t derail your healthy eating goals when enjoyed in moderation.
Sugar content
With around 15-20 grams of sugar per serving, this dessert is sweet enough to satisfy your cravings without being overly indulgent. Using fresh apples allows for natural sweetness, so you can feel good about your choices.
Fiber content
You’ll benefit from about 3-4 grams of fiber per serving, thanks to the wholesome ingredients. Fiber is essential for digestive health, making this dessert not only satisfying but also a bit nutritious!
For more on the importance of fiber in your diet, check out Healthline’s article on dietary fiber.
Enjoy each bite of your homemade apple crisp knowing it can be part of a balanced dessert experience!
FAQs about Cast Iron Skillet Apple Crisp
When diving into the delicious world of cast iron skillet apple crisp, you might have some questions. Don’t worry; I’ve got you covered!
What apples are best for apple crisp?
The type of apples you use can really make or break your apple crisp. For the best results, look for apples that balance sweetness and tartness. Some popular choices include:
- Granny Smith: Tart and firm, these apples hold their shape beautifully when baked.
- Honeycrisp: A perfect mix of sweet and tart, they’re juicy and add great flavor.
- Fuji: Known for their sweetness, Fuji apples can balance the cinnamon and sugar in your crisp.
Explore more about apple varieties here.
Can I prepare it ahead of time?
Absolutely! You can prepare your cast iron skillet apple crisp in advance. Here’s how:
- Pre-assemble: Mix your apples and spices, then layer the crumble topping on top. Cover with plastic wrap and store it in the fridge for up to a day.
- Bake when ready: Just pop it in the oven when you’re ready to enjoy a warm dessert!
This also makes it a great option for entertaining.
How do I make it more crispy?
If you’re striving for that perfect crunch, try these tips:
- Use cold butter: Incorporate chilled butter into your topping. This creates a flaky texture.
- Add oats or nuts: Including rolled oats or chopped nuts in the topping can enhance the crispiness.
- Toast the topping: For an extra crunchy finish, broil the crisp for the last few minutes of baking.
With these pointers, your cast iron skillet apple crisp will become a delicious staple in your dessert repertoire! Enjoy baking, and don’t forget to share your creations!
Conclusion on Cast Iron Skillet Apple Crisp
In wrapping up our delightful journey through the cast iron skillet apple crisp, it’s clear that this dish is more than just a dessert; it’s a comforting hug in a bowl. The combination of warm, spiced apples and a crunchy topping makes for an irresistible fall treat. Whether you’re preparing a cozy dinner at home or impressing friends at a gathering, this recipe is sure to shine. Remember, the beauty of using a cast iron skillet not only enhances the flavor but also allows for perfect caramelization. So, gather your favorite apples, invite some pals over, and create cherished memories around this delicious apple crisp. For more culinary inspiration, check out Serious Eats for a wide array of recipes and tips!
PrintCast Iron Skillet Apple Crisp: The Best Fall Dessert You’ll Love

Enjoy the warmth and comfort of this delicious Cast Iron Skillet Apple Crisp, the perfect fall dessert for any occasion.
- Prep Time: 15 minutes
- Cook Time: 35 minutes
- Total Time: 50 minutes
- Yield: 8 servings 1x
- Category: Dessert
- Method: Baking
- Cuisine: American
- Diet: Vegetarian
Ingredients
- 6 apples, peeled and sliced
- 1/2 cup brown sugar
- 1 tsp cinnamon
- 1/4 tsp nutmeg
- 1 cup rolled oats
- 1/2 cup flour
- 1/2 cup butter, melted
Instructions
- Preheat your oven to 350°F (175°C).
- In a large bowl, toss the sliced apples with brown sugar, cinnamon, and nutmeg.
- Spread the apple mixture evenly in the cast iron skillet.
- In another bowl, mix the oats, flour, and melted butter until crumbly.
- Sprinkle the oat mixture over the apples.
- Bake for 30-35 minutes until the top is golden brown and the apples are bubbling.
- Let it cool for a few minutes before serving.
Notes
- Serve with vanilla ice cream for extra indulgence.
- Can be made ahead and reheated in the oven.
Nutrition
- Serving Size: 1/8 of the skillet
- Calories: 300
- Sugar: 15g
- Sodium: 150mg
- Fat: 12g
- Saturated Fat: 7g
- Unsaturated Fat: 4g
- Trans Fat: 0g
- Carbohydrates: 45g
- Fiber: 4g
- Protein: 3g
- Cholesterol: 30mg
Keywords: Cast Iron Skillet Apple Crisp, Fall Dessert Recipe